Building JAX-RS clients with basic authentication
Building JAX-RS clients with basic authentication
A normal client-server transaction can follow two scenarios of basic authentication. On one hand, a client submits a request to the server without any authentication credentials (as depicted in the previous sequence diagram). On the other hand, a client submits a request to the server with the authentication credentials. Let's take a closer look at these two scenarios.
When a client submits a request without the authentication credentials, the server responds back stating unauthorized access with an HTTP error code of 401. If the request is executed from a web browser, users see the ubiquitous Authentication Required browser popup, as shown here:
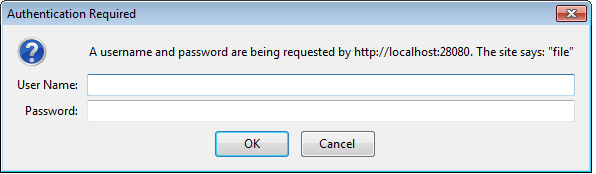
Users can then supply the valid credentials to complete the request. Note that the web browser keeps track of the 401 response and is charged with sending the proper authentication credentials back with the original URI. This makes the transaction seamless for the users. Now, had we been using a client rather than a web browser, we would have needed to programmatically intercept the 401 response and then provide the valid credentials to complete the original request.
The second scenario that comes up while using HTTP basic authentication is when we do not wait for a server's 401 response but provide the authentication credentials at the beginning itself. As we said, we provide the credentials in the HTTP header authorization. The APIs for setting the HTTP headers vary with the client frameworks that you use. The following JAX-RS client example uses the javax.ws.rs.client.ClientRequestFilter implementation to associate the HTTP header authorization with each request. If you need a quick brush up on ClientRequestFilter, refer to the Modifying request and response parameters with JAX-RS filters section, in Chapter 4, Advanced Features in the JAX-RS API:
The next step is to register the preceding filter implementation with the JAX-RS client code that makes the REST API call. The following code snippet illustrates how to accomplish this step. This example invokes a protected RESTful web service URI, /hr/departments, to fetch the departments in an enterprise. The client sets the HTTP basic authentication header via ClientAuthenticationFilter:
The output of preceding program is as follows:
The JAX-RS client runtime invokes all the registered filters before the request has been dispatched to the transport layer. In this example, ClientAuthenticationFilter adds the HTTP authentication header to each request made by the client. Because we are sending the authentication credentials in the first invocation itself, we do not expect a 401 response from the server, and the API call will proceed as any other request.
For the other HTTP request types, such as POST, PUT, and DELETE, the client request process cycle follows the same pattern as shown earlier. The client runtime sets the credentials and proceeds with the request and consumption of the response. Finally, every request type must include the authentication credentials, or else we will have to programmatically handle the server's 401 response. If the client knows the type of authentication required by the target API in advance, it makes sense to attach the necessary authentication content with the very first request itself, which will help you in avoiding an extra round trip that would otherwise be required for authentication.
In the next section, we will learn how to secure a JAX-RS RESTful web service application deployed on a server, such as the GlassFish server.
Securing JAX-RS services with basic authentication :
In this section, we'll cover how to configure a JAX-RS application to challenge the clients for valid authentication credentials.
The basic authentication configuration depends on the web container being used. Throughout this book, we have used the GlassFish server for every application that required a Java web container; therefore, this example also assumes GlassFish as the target server for running the RESTful web APIs. We'll only look at the basic authentication configuration for the latest version of GlassFish (version 4.x).
The problem to solve is restricting the access for RESTful web services by creating a set of users for a specific security realm. A security realm is a mechanism used for protecting application resources. It gives you the ability to protect a resource by defining the security constraints and user roles for granting or restricting access. Let's see how the security realms are defined in the GlassFish server for securing the deployed resources.
Configuring the basic authentication
You can secure the deployed resources in the web server via basic authentication by making the appropriate security entries in the web.xml descriptor file and also in the container (vendor)-specific deployment descriptor file (glassfish-web.xml, in this example).
Let's say we want to use basic authentication for one of the JAX-RS sample web service applications that we built in the previous chapters.
The first step is to update the web descriptor web.xml file to look as follows. Note that web.xml is found in the WEB-INF folder of your web application; you should generate a new one if it is found to be missing:
Here is a quick summary of the core elements that you saw in the preceding web.xmlfile:
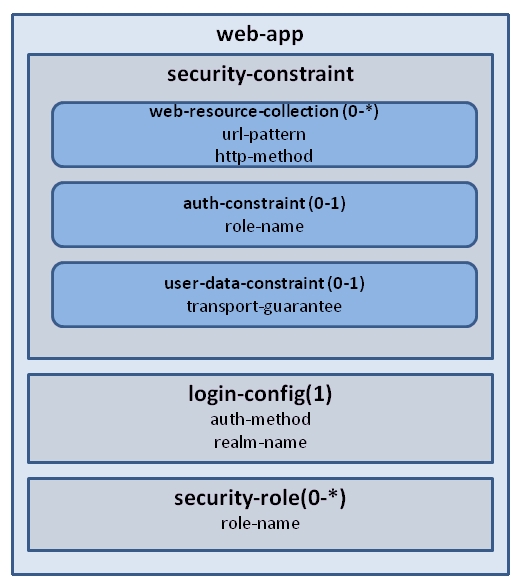
- The <security-constraint> element in web.xml is used to secure a collection of resources by restricting the access to them with the appropriate URL mapping:
- The <web-resource-collection> subelement describes the protected resources in the application, which are identified via URL patterns and HTTP methods.
- The subelement, <auth-constraint>, defines the user roles that are authorized to access constrained resources.
- The subelement, <user-data-constraint>, defines how the data is protected in the transmission channel. It takes the following values: CONFIDENTIAL, INTEGRAL, or NONE. CONFIDENTIAL and INTEGRAL are treated in the same way by the Java EE container, and these values imply the use of the Transport Layer Security (TLS) (HTTPS) to all incoming requests matching the URL patterns present in <web-resource-collection>.
- The element, <login-config>, defines the login configurations used in the application:
- The subelement, <realm-name>, refers to a collection of security information checked for authenticating the user when a secured page (resource) is accessed at runtime. The realm name that you enter should match with the security realm that you configured on the server.
- The subelement, <auth-method>, defines the authorization method used in the application. The possible values are as follows:
- BASIC: This is the HTTP basic authentication that we discussed a while ago.
- DIGEST: This is the same as HTTP basic authentication, except that instead of a password, the client sends a cryptographic hash of user credentials along with the username.
- FORM: This uses an HTML form for login, with field names that match the specific convention. For instance, j_username and j_password are used as names for the username and password fields respectively.
- CLIENT-CERT: This uses a client digital certificate or other custom tokens in order to authenticate a user.
- The element, <security-role>, defines all the security roles used in the application.
Let's get back to the configurations for basic authentication that we were discussing. The web.xml file that we used for this example is read by the web server to infer that the web application uses basic authentication and that any URI access must be authenticated for the role name, APIUser. This means that to access the URI, http://hostname:port/rest-chapter6-service/webresources/hr/departments, the user should belong to the APIUser role.
We have not yet finished the configuration entries for the web application. The following step is to map the role that we specified in web.xml (APIUser) to the user groups that we will define on the server. This configuration is done on the vendor-specific deployment descriptor, glassfish-web.xml:
While configuring the security realm on the server, we should map the actual users of the application to the user groups as appropriate. This is explained in the next section. Though the basic concepts of the security configuration remain the same across various Java EE servers, the actual steps may vary. This example takes GlassFish as a server and explains the security configurations in the next section.
Defining groups and users in the GlassFish server
GlassFish allows you to define users for the application using the concept of realms. As we mentioned in the previous section, a security realm can be treated as a mechanism that allows us to define users and groups. GlassFish offers various credential realms, including FileRealm, JDBCRealm, JNDIRealm, LDAPRealm, and so on. In this example, we will use an existing FileRealm that comes with GlassFish by default. Here are the steps for adding users and groups to the FileRealm in GlassFish:
- Start the GlassFish server. If you are new to the GlassFish server, take a look at the tutorial at https://javaee.github.io/glassfish/doc/4.0/quick-start-guide.pdf.
- Log in as the administrator to Admin interface.
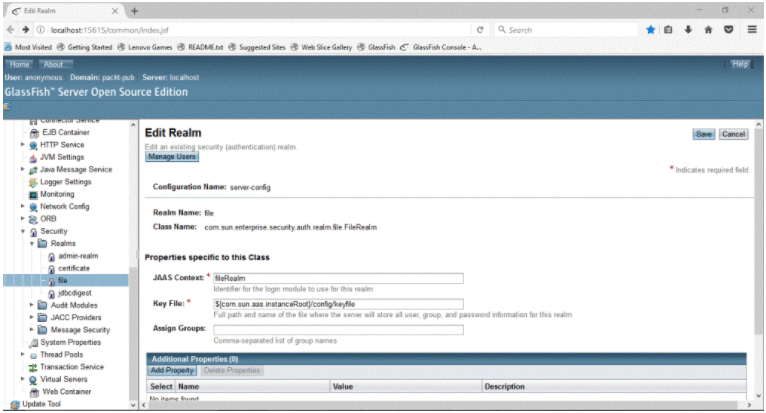
- Navigate to Configurations | server-config | Security | Realms | File. In this example, we use a file to store the user information. In a real-life scenario, you may use LDAP or RDBMS:
- Click on the Manage User button at the top of the page:
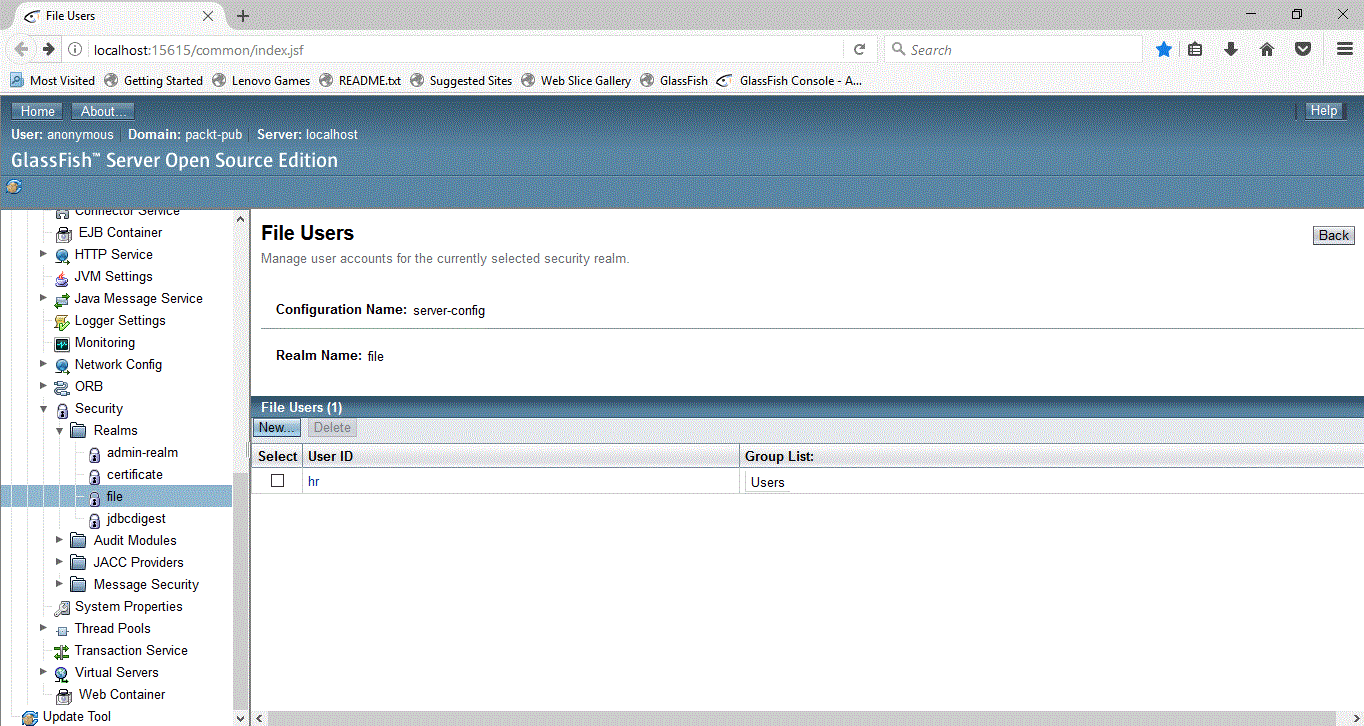
- On the File Users page, click on New, add a user, and give a password. Set the appropriate Group List value. In web.xml, we have configured Users as a group, so specify the same name as a value for Group List, for this example:
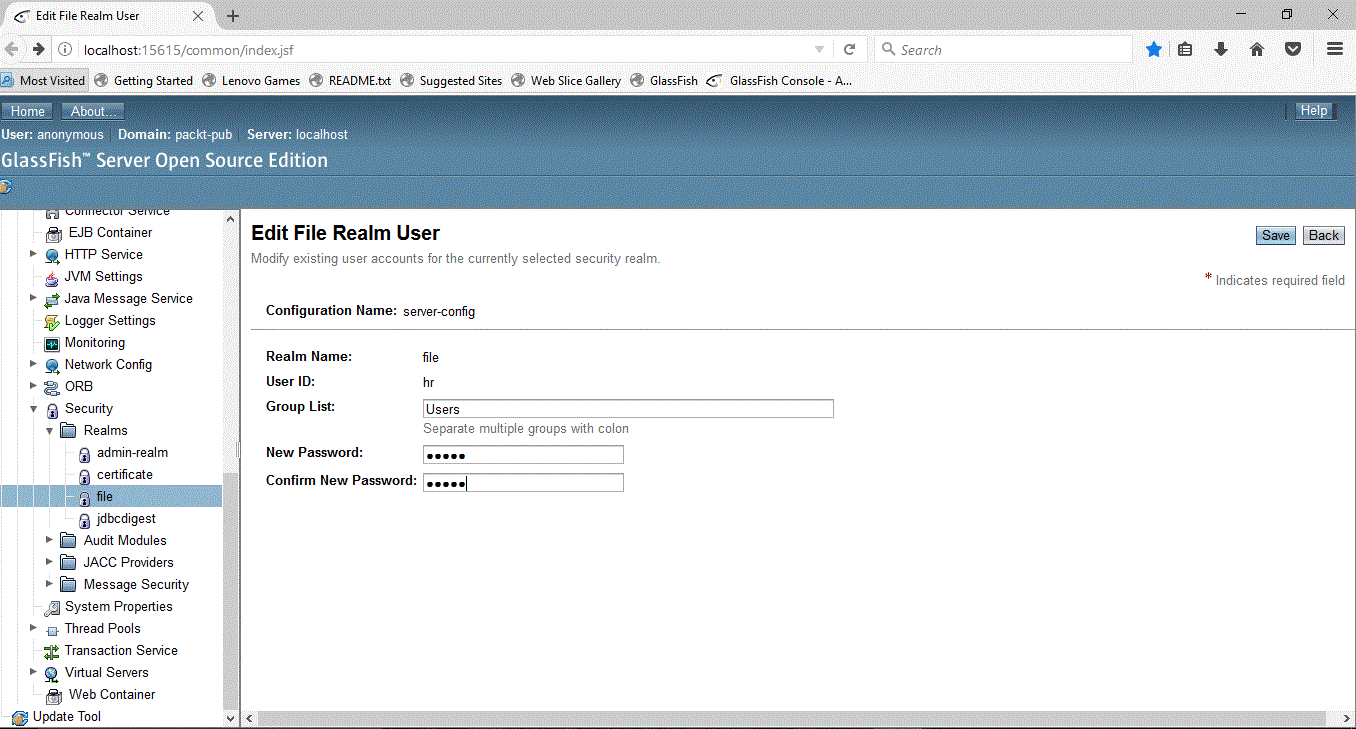
- Click on OK to save the changes.
Now, you can deploy the secured RESTful web service application into the server. The client can use the username and password that we configured in this section for accessing the RESTful web APIs.
The basic authentication methods described here have a fundamental security hole. It sends the credentials as clear text in every HTTP request. Therefore, we need a mechanism to ensure that the credentials cannot be spoofed during a transaction. The solution is to use the Secure Socket Layer (SSL) or Transport Layer Security (TLS) protocol.
TLS/SSL is a well-understood web protocol, and because the RESTful web services we implemented in the previous chapters are nothing more than the server components, all we need to do is configure GlassFish to use the TLS/SSL; therefore, every request and response message between the clients and servers, assuming the TLS/SSL has been configured properly, will now be encrypted.
Just remember that once the TLS/SSL has been turned on, the requests will be HTTPS requests; this means that URIs take the form of https://<REST-RESOURCE-URI> (note the https prefix in the address).


Comments
Post a Comment